The Ingredients
A simple recipe, by Leon Brooks.
Copyright © 2003 Leon Brooks of CyberKnights Pty Ltd. See the GNU Free Documentation Licence for copying conditions. Semi-apologies for the fonts in the concept diagram, some of them don’t get out often. This is version 0.1 of 22 June 2003.
One computer running MS-Windows or a recent version of WINE; and
Internet connectivity for it; and
A modern (0.53 or later) version of PuTTY (round of applause for Simon Tatham) installed on it; and
A Linux (or other Unix) gateway elsewhere on the Internet running sshd; and
A service to access on a LAN behind that gateway, typically either telnet-based, Remote Desktop or VNC.
Optionally, a copy of XMing for running graphic applications over the wire.
Optionally, PuTTY is now available on other platforms. These instructions also work just fine for a Linux-to-Linux PuTTY tunnel.
1. Start PuTTY. You will see a window somewhat like this one:
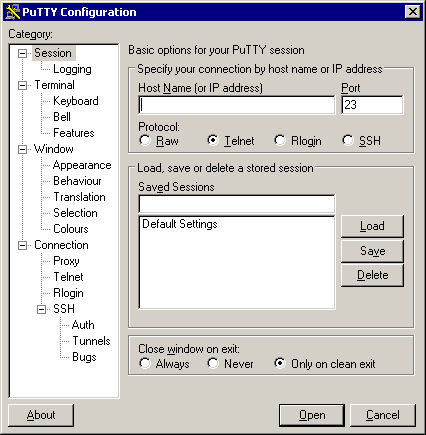
2.
Run through the settings tweaking stuff for a nice PuTTY experience;
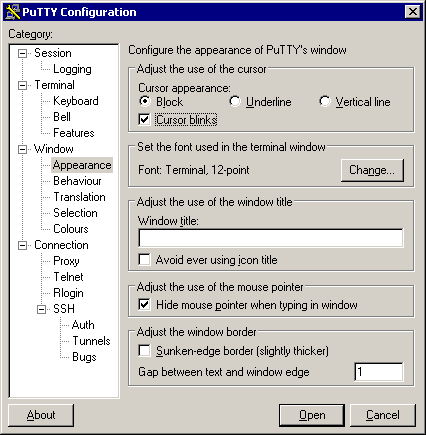
start by clicking on the Appearance subcategory and making the
cursor a blinking block (to make it easy to find), then choose a font
which includes all of the extended VT-100 characters.
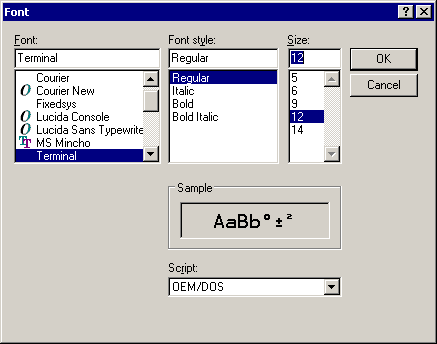
2a.
I generally use 12-point Terminal:
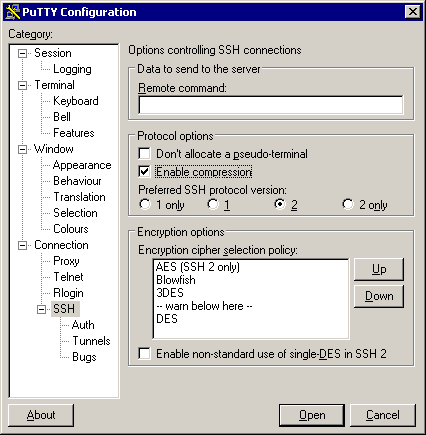
3.
Next (unless your Internet link is too fast, say, 100 megabit, to
bother with this), enable compression. Select SSH protocol level 2 as
the default in the SSH subcategory for better security:
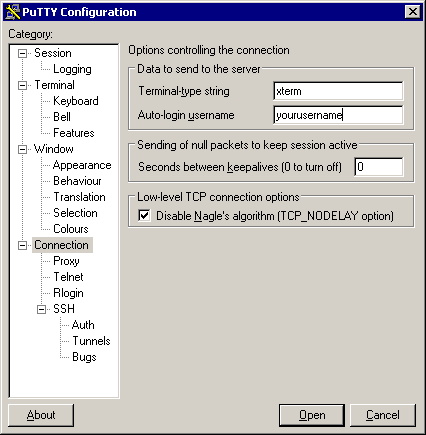
4.
Set up a username unless you want the user to choose one themselves.
If your internet access goes out through a masquerade or NAT of some
sort and you want to defeat connection timeouts on it, set the
keepalives to a reasonable number of seconds (say, 480). PuTTY will
send null packets at that interval, each of which resets any
timeouts.
5.
If the connection is to be totally automated, generate a key (with
PuTTYgen, on Windows, or ssh-keygen on Linux/Unix) and tell PuTTY
where the private half is:
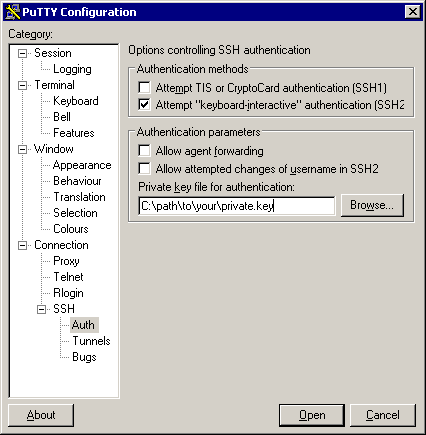
The
public half needs to be sent to the remote gateway and installed
there, typically by adding it to the file ~/.ssh/authorized_keys or
~/.ssh/authorized_keys2.
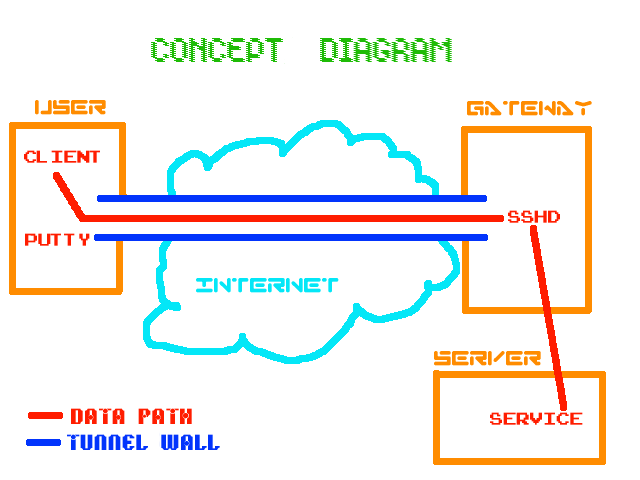
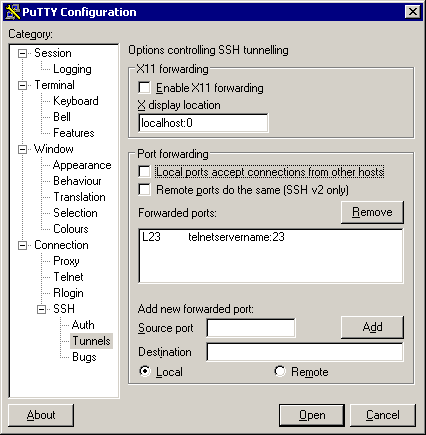
6. This is the core and key to it all, the tunelling setup. In this example, we’re tunneling the telnet port on the local machine, through the gateway to the telnet port on the remote server “telnetservername”. This name is resolved from the remote gateway machine, so it can be a hostname not visible to the user machine.
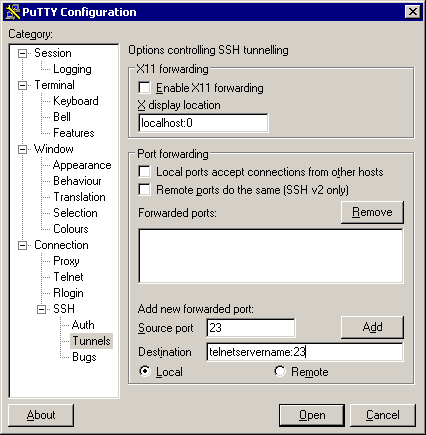
If
the user machine is also behind a firewall and you want other
machines to use the same tunnel, switch on “Local ports accept
connections”.
Do not enable this if your MS-Windows box is exposed to the Internet (a bad idea in itself) because you will be giving the whole world unencrypted telnet access to the server – at which point those who know about it will be putting together sweepstakes on how many minutes it takes an intruder to discover this.
The source port is the port on the user machine (see first diagram if confused) to which you will address connections that you intend to have tunnelled. The destination defines a host and a port to which the remote gateway’s sshd will connect incoming traffic from the user machine. When you click on Add, the results are displayed like this:
If
you’d established a remote tunnel (instead of a local one), the list
would say Rport localhostname:port and
cause the gateway’s sshd (if permitted) to be listening on the source
port for connections; these would be forwarded out to the destination
from the user machine (exactly the reverse of the tunnel we just set
up).
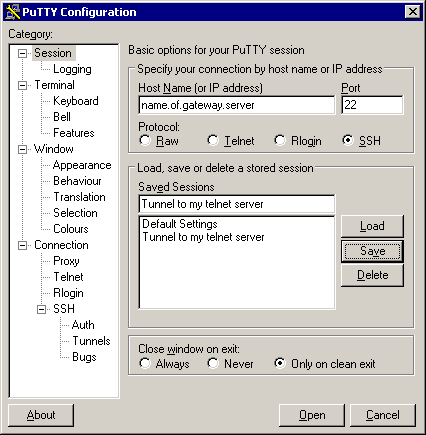
7. Flip back to the Session subcategory, identify the gateway host’s Internet interface address (you will need a dynamic DNS service to do this if the gateway’s Internet connection does not have a fixed IP address), mention that it’s SSH, name your session (in this case “Tunnel to my telnet server” and save it:
8.
Whenever you need the tunnel to appear, you can start PuTTY and
double-click that session.
9. To automate this one step further, define an icon (“short cut”) with a program string like this – putty -load "Tunnel to my telnet server" – set to run minimised. If you’re using an encryption-key login (described in step 5 above), all you do to establish the tunnel is double-click on your new icon.
Telnet applications are obvious. The final SCO server that I supported (never again: SCO Unix is horrid, I can’t imagine why SCO’d suspect anybody of copying from it) had a core application that required a telnet connection. PuTTY made doing this securely as a road warrior trivial.
Terminal Services have a particular problem if the user machine is running MS-Windows XP. XP “knows” that connecting to localhost will produce an infinite loop, and in a fit of over-protectiveness refuses to allow you to connect the TS client to any port on 127.0.0.1.
XP also has a useful bug: any traffic which makes it to the loopback device is treated as locally addressed regardless of the destination IP value (ie, it will even answer queries outside the range 127.0.0.0 to 127.255.255.255 if they’re routed to it), so all you need do is point the TS client at an address that will normally be routed to the loopback interface, such as 127.0.0.2.
Now... while I’m eternally grateful for a way to work around the safeties, does it make sense to answer all traffic to loopback but only deny TS the ability to connect to just one (out of about 16 million) of the addresses normally routed there?
It gets worse. A friend’s XP-laden laptop one day decided (presumably for the friend’s own good) that the loopback interface needed an automatically assigned address. Due to a surprising dearth of DHCP servers listening on the loopback interface, it eventually settled on 169.254.blah.blah and many applications expecting to see and use 127.0.0.1 had nervous breakdowns.
No worries, we thought, let’s set it back to 127.0.0.1. Set it to a fixed address, happy as Larry (whoever he is), but 127.0.0.1? No, sorry, that’s a reserved address. Thwack. This is the loopback interface, silly machine! So we used the above tactic and set it to 127.0.0.2, where it resides to this day [weeeeell... until about October 2003, anyway. XP gutted itself and the owner wiped and reinstalled his boot disk, “fixing” the problem en passant].
A Remote tunnel can be used for forwarding an X session to a local X server, permitting you to run Linux/Unix applications on the remote server but display them on your MS-Windows workstation. To do this, tell your local X server to listen for traffic from the user machine (workstation), and set the server’s DISPLAY environment variable to point to port 6000 on the gateway. If the gateway already has an X display running, use DISPLAY=gateway:1 and port 6001 at the remote end, but still forward that to port 6000 on the local end. PuTTY has a convenience option for X forwarding.
Email can be POPped from a server (possibly including the gateway) normally only accessible from within the gateway’s LAN by forwarding a connection to port 110 on the mail server.
FTP, bane of firewalls (it requires a connection back from the server to the client) will fail (yes, even in passive mode); or
Anything that uses UDP like the SMB/CIFS (MS-Windows) or NFS network file systems and many video-conferencing protocols, likewise ICMP (PuTTY tunnels only TCP); or
IRC’s DCC mode (same problem as FTP); or
Many Instant Messenger protocols; or
eDonkey; or
Programs that feel it necessary to do an identd or similar request back to the caller before responding.
In some of the above cases, this is generally not regarded as a bad thing.
Try a PPP-over-SSH tunnel, which takes all protocols (VPN) and is not much more difficult to set up.
Consider using IPSec, which is faster-responding (it’s based on UDP not TCP) but can be a little trickier to set up, and does require super-user access on the gateway server.
Because of the way IPSec works, you will need to define four tunnels (LAN-LAN, gateway-gateway, gateway-LAN and LAN-gateway) if you want completely secure traffic from end to end including the gateways themselves. On Linux you can use iproute2 to make one LAN-LAN tunnel work for all of the above cases by ordering all traffic intended for the other end of the VPN to originate from the LAN interface.
OpenVPN is a fairly powerful networking tool. That makes it a tad more complicated to set up than PPP-over, but it will work in a variety of ports, protocols and methods, making it a better long-term solution.
Another reasonable compromise solution is the Zebedee tool.
The following people (s/ splat /@/ for real email) have provided helpful comments on this text. I have not taken all of those comments on board, so if there are still gross errors, omissions or misrepresentations, don’t blame them. (-:
Thanks also to Kimberly Shelt <kim splat linmagau.org> for nagging me into applying those fixes and tidying this up a bit.
Bill Kenworthy <billk splat ii.net>
Onno Benschop <onno splat itmaze.com.au>
James Devenish <devenish splat guild.uwa.edu.au>